چگونه با پرامپتهای ChatGPT تصاویر خود را به شاهکار تبدیل کنیم؟
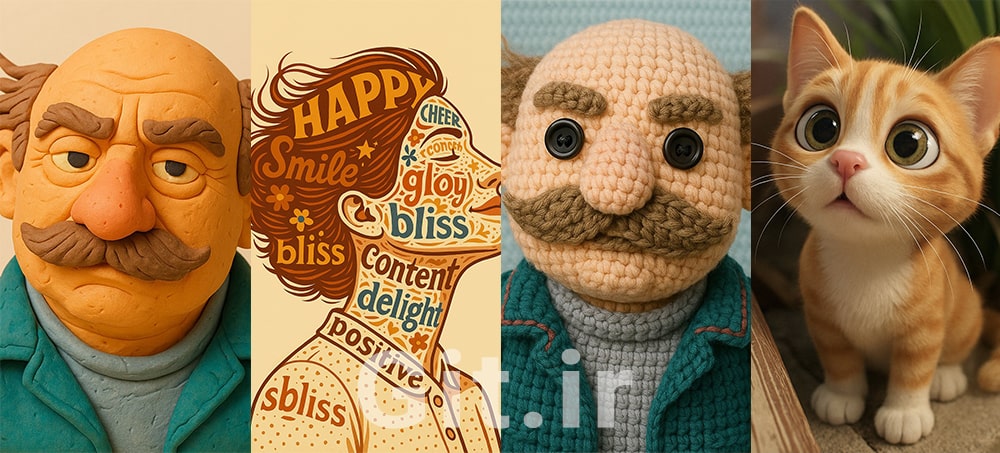
هوش مصنوعی در سالهای اخیر به ابزاری بینظیر برای خلاقیت تبدیل شده است. یکی از پیشرفتهترین ابزارهای این حوزه، ChatGPT است که نهتنها در تولید متن، بلکه در ویرایش و تبدیل تصاویر نیز تواناییهای خیرهکنندهای دارد. با استفاده از پرامپتهای دقیق و خلاقانه، میتوانید تصاویر خود را به آثار هنری منحصربهفرد تبدیل کنید؛ از عروسکهای بافتنی گرفته تا پرترههای تایپوگرافیک یا حتی مجسمههای مرمری! در این مقاله، به بررسی مجموعهای از پرامپتهای کاربردی برای ویرایش تصاویر در ChatGPT میپردازیم و نشان میدهیم چگونه میتوانید با این ابزار، خلاقیت خود را به اوج برسانید.
🔷 بیشتر بخوانید: آشنایی با ChatGPT و راهنمای استفاده از آن
فهرست مطالب
- چرا پرامپتها مهم هستند؟
- معرفی پرامپتهای خلاقانه برای ویرایش تصاویر
- بافتنیهای دوستداشتنی (Amigurumi Crochet)
- استیکرهای احساسی
- کاردستی کاغذی مینیمال
- مجسمههای خمیری (PlayDoh)
- عروسکهای مکدونالدی
- کوسنهای پفی
- سبک پیکسار
- پوستر باهاوس
- پرتره قاجاری
- اموجیهای پشمالو
- نقاشی به عکس
- طراحی به سبک Low-Poly
- مجسمه مرمری
- ترمیم عکسهای قدیمی
- حماسه شاهنامه
- نوستالژی دهه پنجاه ایران
- عروسکهای فوتورئالیستی
- لباس عروس
- جلوه پشمالوی لوگو
- پرترههای تایپوگرافیک
- مداد رنگی روی کاغذ
- قلم زنی و آبرنگ
- تبدیل عکس به فرمت کتابهای رنگ آمیزی
- حکاکی روی چوب
- نوشتن اسم با خط هیروگلیف
- نکات کلیدی برای استفاده از پرامپتها
- نتیجهگیری
چرا پرامپتها مهم هستند؟
پرامپتها در واقع زبان ارتباطی ما با هوش مصنوعی هستند — دستورالعملهایی متنی که به مدلهای زبانی مثل ChatGPT یا ابزارهای تصویرساز میگویند دقیقاً چه کاری انجام دهند و چگونه انجام دهند. هرچه پرامپت دقیقتر و هدفمندتر نوشته شود، خروجی هوش مصنوعی هم طبیعیتر، حرفهایتر و خلاقانهتر خواهد بود.
در زمینهی ویرایش و تولید تصویر با هوش مصنوعی، یک پرامپت خوب باید جزئیاتی مانند سبک هنری (مثلاً رئالیستی، دیجیتال آرت یا نقاشی آبرنگ)، بافت و رنگها، نورپردازی (مثل نور ملایم صبحگاهی یا سایهدار دراماتیک) و حتی حس و حال احساسی تصویر (شادی، آرامش، رمزآلودگی) را در بر بگیرد. این جزئیات به مدل کمک میکنند تا خروجی دقیقاً مطابق ذهن شما تولید شود، نه صرفاً یک تصویر تصادفی.
پرامپتهای ارائهشده در این مقاله با دقت طراحی و آزمایش شدهاند تا ترکیبی از کیفیت بصری بالا، خلاقیت، و کاربرد واقعی را ارائه دهند. هر پرامپت در واقع فقط یک دستور ساده نیست، بلکه پلی است میان تخیل شما و تواناییهای بیپایان هوش مصنوعی.
به زبان ساده، پرامپت خوب، تفاوت بین یک تصویر معمولی و یک اثر هنری هوش مصنوعی است — و یادگیری نحوهی نگارش آن، اولین گام برای تبدیل ایدههایتان به واقعیت دیجیتال محسوب میشود.
معرفی پرامپتهای خلاقانه برای ویرایش تصاویر
در ادامه، به پرامپتهای ارائهشده و کاربردهای آنها پرداختهایم. این پرامپتها طیف وسیعی از نیازها را پوشش میدهند؛ از خلق آثار کودکانه و بازیگوش تا تولید تصاویر تاریخی و حماسی.
1. بافتنیهای دوستداشتنی (Amigurumi Crochet)
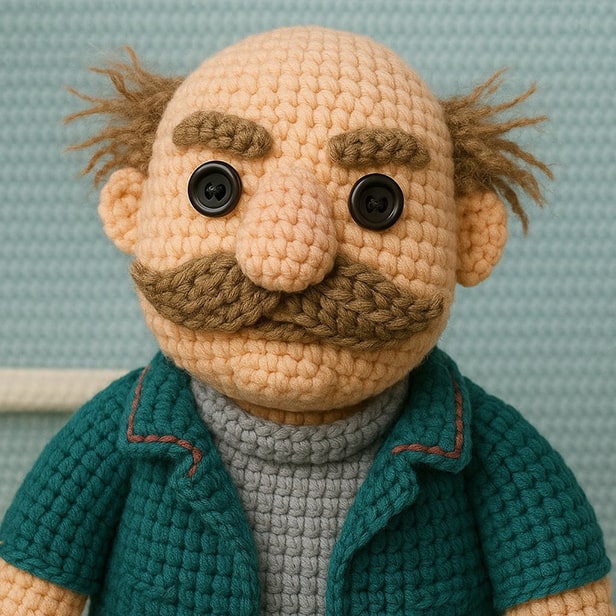
توضیح: تبدیل تصویر به یک صحنه بافتنی با نخهای نرم و عروسکهای دستساز.
مثال استفاده: عکسی از کودک خود آپلود کنید و با این پرامپت، نسخهای عروسکی و سهبعدی از او بسازید که انگار با دست بافته شده است!
{
  "prompt": {
    "type": "image_transformation",
    "style": "amigurumi_crochet",
    "description": "Create a crocheted amigurumi interpretation of the uploaded photo, recreated entirely in soft yarn textures. Transform the scene into plush dolls and fabric elements while maintaining the original composition, color palette, and recognizable poses. All elements including background and characters should appear handcrafted with visible stitching, button eyes, and detailed crochet patterns. The final result should have a cute, soft, and three-dimensional appearance resembling a handmade diorama.",
    "technical_details": {
      "medium": "yarn",
      "technique": "crochet",
      "texture": "soft, plush, tactile",
      "distinguishing_features": [
        "visible stitching",
        "button eyes",
        "detailed crochet patterns",
        "handmade aesthetic"
      ]
    },
    "composition_notes": "Preserve the original spatial arrangement and color relationships while transforming all elements into crocheted forms"
  }
}
2. استیکرهای احساسی
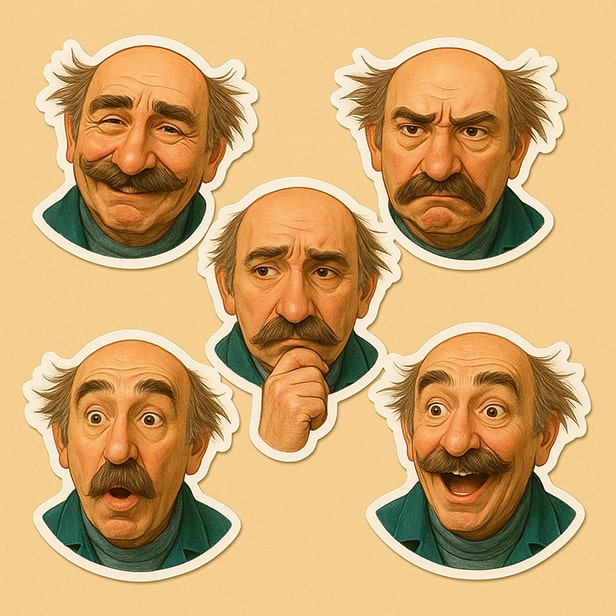
توضیح: خلق 6 استیکر با حالات مختلف چهره (شاد، غمگین، عصبانی، متعجب، متفکر، هیجانزده).
مثال استفاده: عکسی از خودتان آپلود کنید و استیکرهایی با حالات مختلف چهره برای استفاده در چتهای خود بسازید.
{
  "prompt": "Create a canvas with 6 sticker designs featuring different facial expressions. Each sticker should:\n\n  1. Display one of these distinct expressions: happy, sad, angry, surprised, thoughtful, and excited\n  2. Feature clear, expressive facial features that effectively communicate the emotion\n  3. Each sticker should have a clean white border surrounding the illustration\n  4. Arrange all 6 stickers in a pleasing composition on a warm beige background (#F5E8D0)\n  5. The expressions should be easily recognizable and distinct from one another\n  6. Use appropriate colors that help convey each emotion effectively\n  7. The overall canvas should feel like a cohesive collection while each sticker maintains its individual character\n  8. The stickers should have a slightly glossy finish to enhance the visual appeal\n  9. Each facial expression should be drawn with attention to facial muscle movements that characterize the emotion (e.g., raised eyebrows for surprise, furrowed brow for anger)\n  10. The focus should be on the facial expressions themselves rather than elaborate backgrounds or details",\n  "negative_prompt": "Emojis, Persian miniature style, cartoon characters, 3D rendering, photorealism, overly simplified faces, gradient backgrounds, drop shadows, childish illustrations, clip art aesthetic, abstract faces, ambiguous expressions",\n  "settings": {
    "canvas_size": "3000x3000",
    "background_color": "#F5E8D0",
    "sticker_border_width": "15px",
    "sticker_border_color": "#FFFFFF",
    "sticker_size": "approximately 800x800 pixels each",
    "arrangement": "balanced grid layout without overlap",
    "finish": "semi-glossy"
  }
}
3. کاردستی کاغذی مینیمال
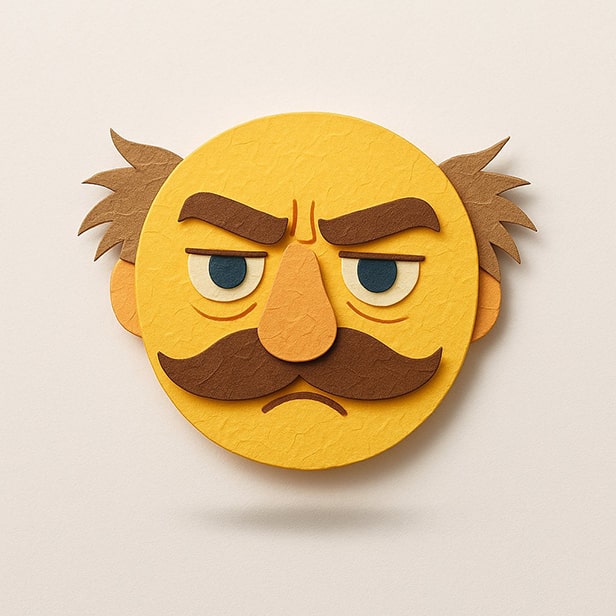
توضیح: تبدیل تصویر به یک اموجی کاغذی با بافتهای قابلمشاهده و سایههای نرم.
مثال استفاده: یک تصویر ساده از یک حیوان آپلود کنید و آن را به یک اموجی کاغذی زیبا تبدیل کنید.
{
  "style": "paper_cut",
  "description": "A paper craft-style emoji floating on a pure white background. The emoji is handcrafted from colorful cut paper with visible textures, creases, and layered shapes. It casts a soft drop shadow beneath, giving a sense of lightness and depth. The design is minimal, playful, and clean — centered in the frame with lots of negative space. Use soft studio lighting to highlight the paper texture and edges.",
  "background": {
    "color": "pure_white",
    "type": "solid"
  },
  "lighting": {
    "type": "soft_studio",
    "purpose": "highlight_texture_and_edges"
  },
  "composition": {
    "subject_position": "centered",
    "negative_space": "ample"
  },
  "technical_elements": {
    "depth": "soft_drop_shadow",
    "details": [
      "visible_paper_textures",
      "creases",
      "layered_shapes",
      "cut_edges"
    ]
  },
  "mood": [
    "minimal",
    "playful",
    "clean",
    "light"
  ]
}
4. مجسمههای خمیری (PlayDoh)
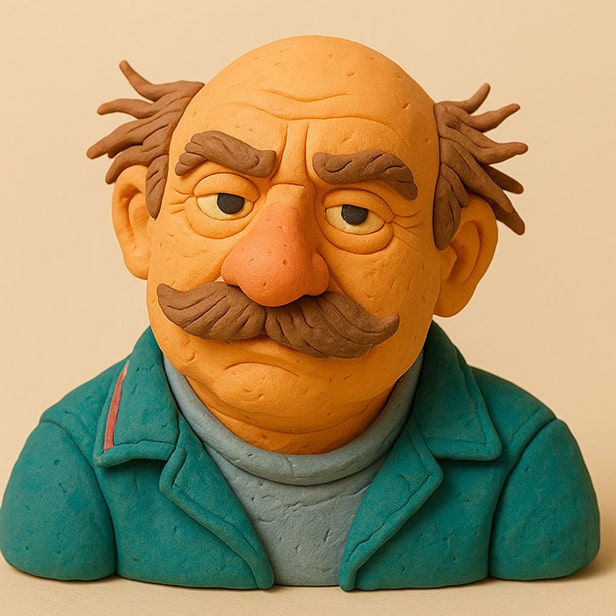
توضیح: تبدیل تصویر به مجسمهای سهبعدی از جنس خمیر بازی با جزئیات دقیق.
مثال استفاده: عکسی از یک شخص یا شخصیت خیالی آپلود کنید و آن را به یک مجسمه خمیری شاد تبدیل کنید.
{
  "prompt": "Transform this image into a detailed 3D PlayDoh sculpture, maintaining all important features and proportions of the original. Render the subject with a smooth, slightly textured clay-like surface that resembles PlayDoh, with subtle fingerprint impressions and tool marks for authenticity. Preserve facial details and expressions with careful attention to maintain strong similarity to the original person. Recreate all clothing, accessories, and distinguishing features with PlayDoh textures while keeping their original colors and patterns. Remove the original background completely and replace with a soft, creamy beige surface, adding a subtle drop shadow beneath the figure for depth. The lighting should be soft and even to highlight the dimensional quality of the PlayDoh sculpture. The final result should look like a professional clay artist recreated the subject with PlayDoh while ensuring the person remains easily recognizable.",
  "style": "3D PlayDoh",
  "preservation": {
    "details": "all",
    "facial_similarity": "high",
    "clothing": "maintain original colors and patterns",
    "proportions": "maintain original"
  },
  "background": {
    "type": "replace",
    "color": "creamy beige",
    "effect": "subtle drop shadow"
  },
  "texture": {
    "type": "PlayDoh clay",
    "features": ["smooth surface", "subtle fingerprint impressions", "tool marks"]
  },
  "lighting": "soft and even"
}
5. عروسکهای مکدونالدی
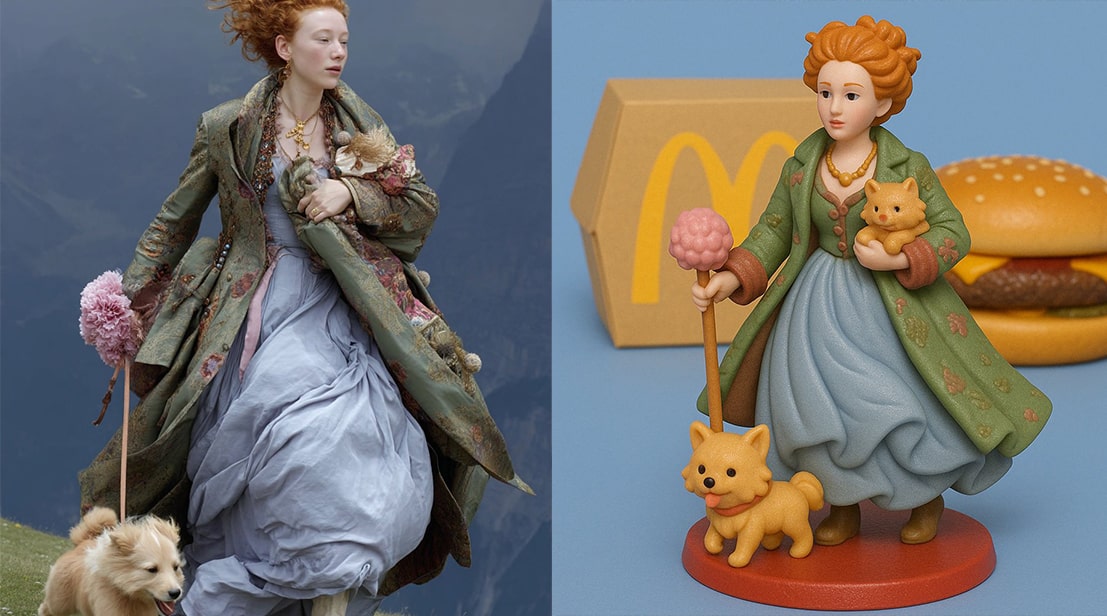
توضیح: تبدیل تصویر به یک فیگور پلاستیکی براق، شبیه اسباببازیهای همبرگر مکدونالد.
مثال استفاده: یک شخصیت کارتونی را آپلود کنید و با پرامپت زیر آن را به یک فیگور کلکسیونی تبدیل کنید.
{
  "task": "image_transformation",
  "output_type": "collectible_toy_figure",
  "style": {
    "material": "plastic",
    "finish": "glossy",
    "presentation": "display_base",
    "lighting": "soft",
    "background": "clean_minimal"
  },
  "character_properties": {
    "body_type": "full_body",
    "colors": "vibrant_playful",
    "outfit": "maintain_original",
    "gender_presentation": "preserve_original"
  },
  "special_instructions": [
    "Complete any partial or missing body parts from original image",
    "Maintain all key outfit elements from source image",
    "Position figure on simple display stand",
    "Ensure gender presentation remains clear and consistent with original"
  ]
}
همچنین میتونید از این پرامپت هم استفاده کنید:
"Transform the uploaded image into a collectible toy figure that could be included as a gift with a McDonald's burger meal. Stylize the character as a small, plastic figurine placed on a simple display base. Include a realistic McDonald's burger and its branded packaging in the background to give the impression of a Happy Meal toy promotion. Use soft lighting and a clean background, keeping the colors vibrant and playful."
6. کوسنهای پفی
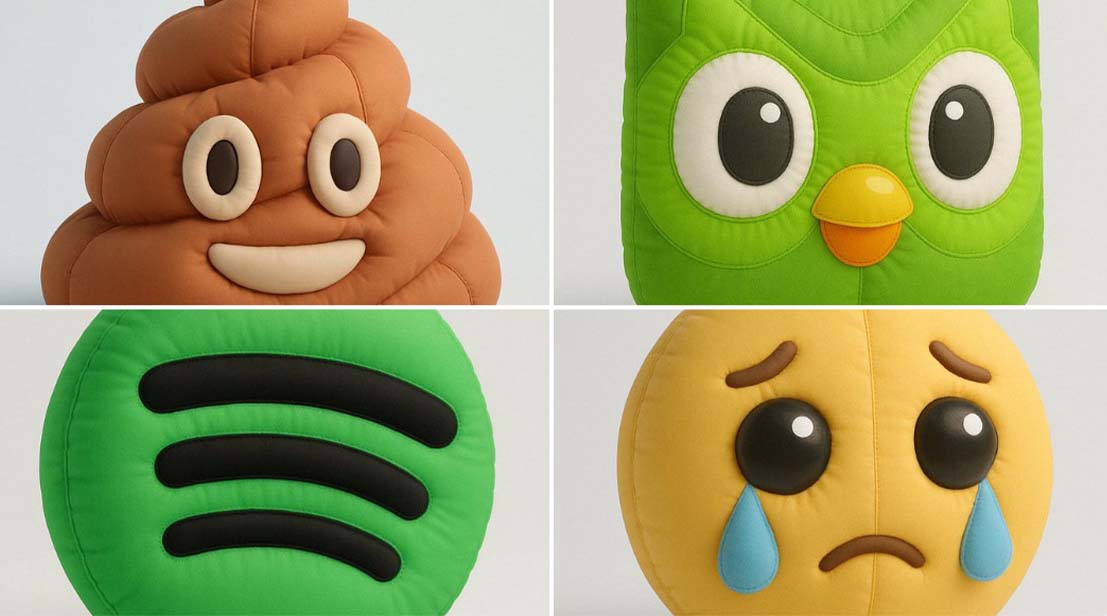
توضیح: تبدیل تصویر یا اموجی به یک شیء پفی و نرم مثل بالن یا اسباببازی بادی.
مثال استفاده: یک اموجی قلب آپلود کنید و آن را به یک کوسن سهبعدی تبدیل کنید.
"Create a high-resolution 3D render of [ ] designed as an inflatable, puffy object. The shape should appear soft, rounded, and air-filled — like a plush balloon or blow-up toy. Use a smooth, matte texture with subtle fabric creases and stitching to emphasize the inflatable look. The form should be slightly irregular and squishy, with gentle shadows and soft lighting that highlight volume and realism. Place it on a clean, minimal background (light gray or pale blue), and maintain a playful, sculptural aesthetic."
7. سبک پیکسار
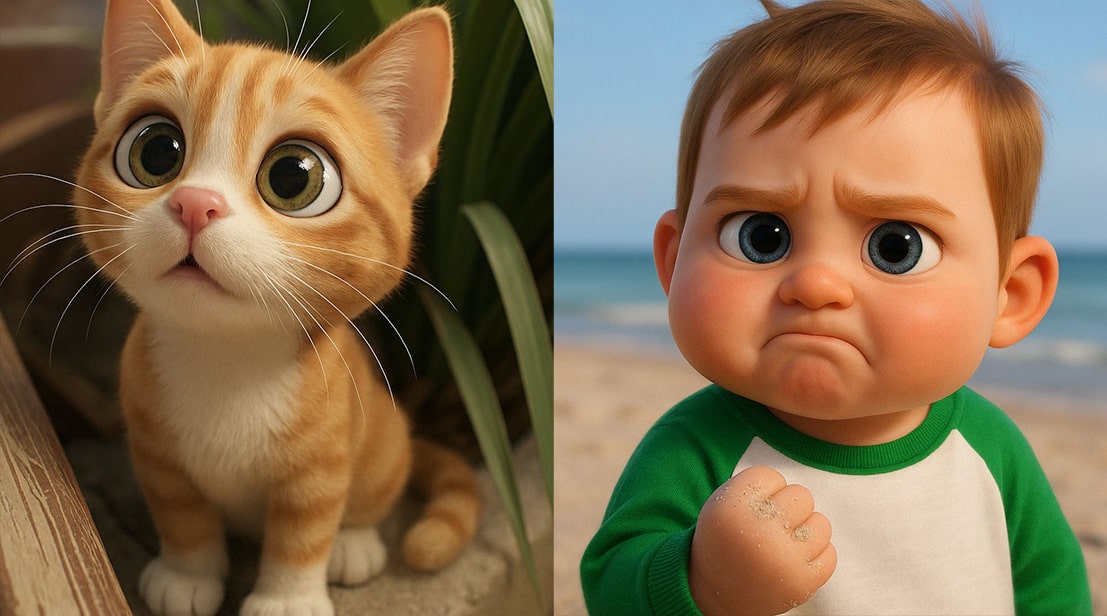
توضیح: تبدیل تصویر به رندر سهبعدی با سبک انیمیشنهای پیکسار.
مثال استفاده: عکسی از خودتان آپلود کنید و خود را به یک شخصیت انیمیشنی پیکسار تبدیل کنید.
"Restyle this image to A 3D render, smooth texture and a soft skin, large expressive eyes, cartoonish, soft lighting, subtle glow, highly detailed with a Pixar-like style"
8. پوستر باهاوس
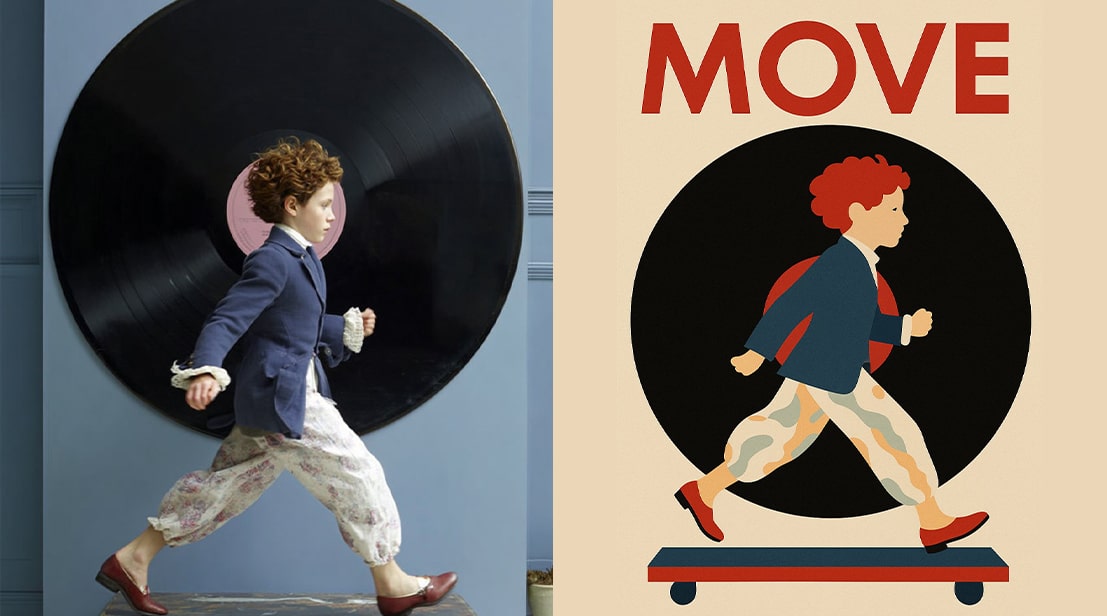
توضیح: تبدیل تصویر به پوستر با سبک باهاوس و افزودن شعار.
مثال استفاده: عکسی از یک شیء آپلود کنید و آن را به یک پوستر تبلیغاتی شیک تبدیل کنید.
"Create a Bauhaus-style poster from this image and add the slogan [Move] as the title."
9. پرتره قاجاری
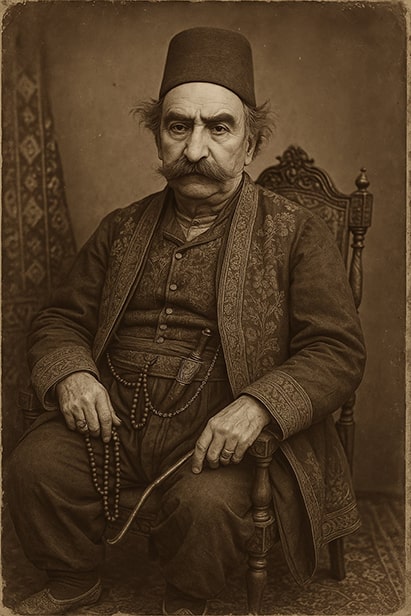
توضیح: تبدیل تصویر به عکسی با سبک عکاسی دوران قاجار.
مثال استفاده: عکسی از پدربزرگ خود آپلود کنید و او را در لباس قاجاری تصور کنید.
{
  "style": {
    "reference": "Qajar era photography",
    "period": "19th century Persian",
    "format": "formal seated portrait"
  },
  "subject": {
    "base": "User-provided portrait",
    "posture": "Seated formally",
    "expression": "Dignified, serious"
  },
  "attire": {
    "headwear": ["kulah felt hat", "traditional turban"],
    "upperGarments": {
      "primary": "embroidered qaba coat",
      "secondary": "brocade waistcoat",
      "patterns": ["Persian floral", "geometric designs"]
    },
    "lowerGarments": "wide shalvar trousers",
    "footwear": ["leather shoes", "embroidered slippers"]
  },
  "accessories": {
    "jewelry": ["gold/silver rings", "pocket watch"],
    "cultural": ["prayer beads (tasbih)", "ornate dagger (khanjar)", "smoking pipe"],
    "furniture": "ornate Persian wooden chair"
  },
  "background": {
    "elements": ["Persian carpet", "traditional textiles", "simple studio backdrop"],
    "lighting": "soft, diffused studio lighting"
  },
  "photoEffects": {
    "colorTone": "sepia or black and white",
    "aging": {
      "intensity": "moderate",
      "elements": ["slight fading", "subtle scratches", "mild foxing", "paper texture"]
    }
  },
  "technicalParameters": {
    "detailLevel": "high",
    "proportions": "maintain accurate facial structure",
    "processing": "historically accurate photo aging"
  }
}
10. اموجیهای پشمالو
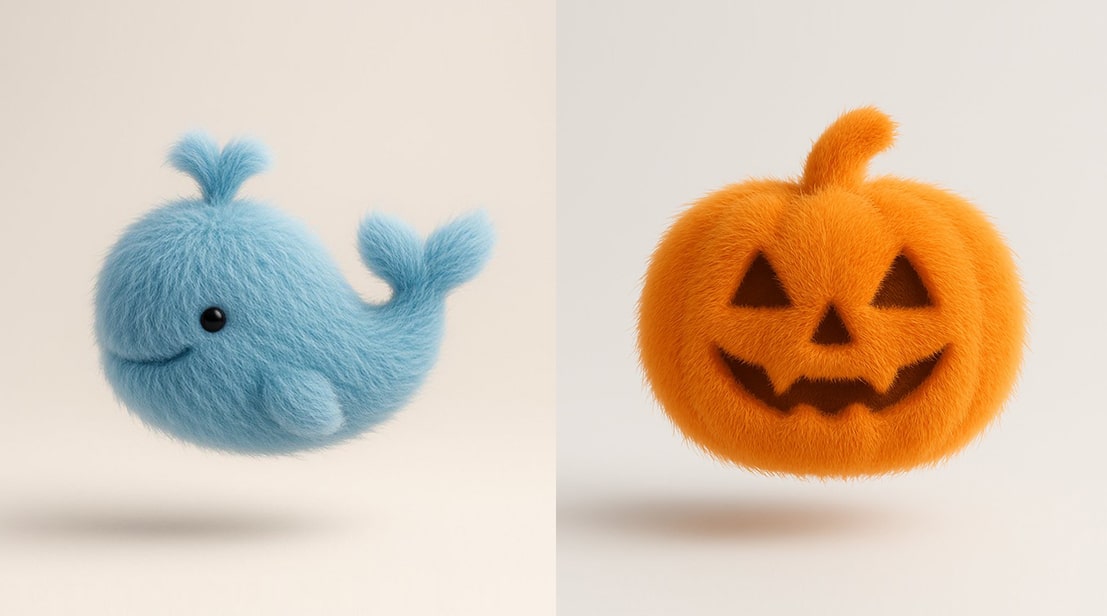
توضیح: تبدیل آیکونهای تخت به اشیاء سهبعدی پشمالو.
مثال استفاده: یک آیکون ستاره آپلود کنید و آن را به یک شیء پشمالوی شناور تبدیل کنید.
"Transform a simple flat vector icon of [] into a soft, 3D fluffy object. The shape is fully covered in fur, with hyperrealistic hair texture and soft shadows. The object is centered on a clean, light gray background and floats gently in space. The style is surreal, tactile, and modern, evoking a sense of comfort and playfulness. Studio lighting, high-resolution render."
11. نقاشی به عکس
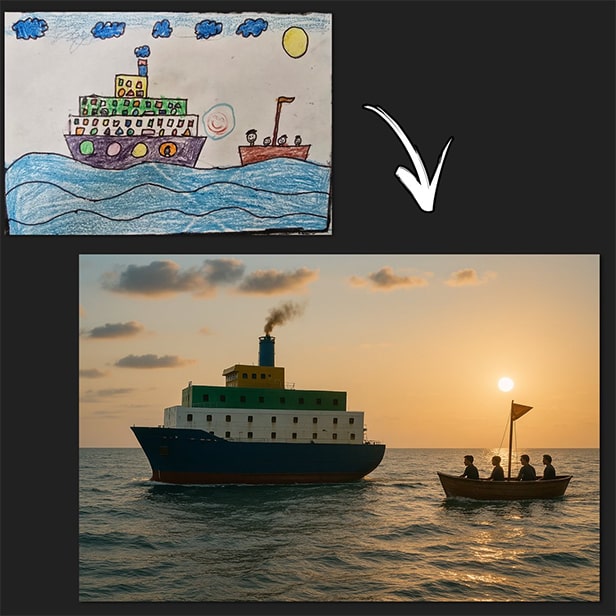
توضیح: تبدیل نقاشیها به تصاویر فوتورئالیستی.
مثال استفاده: یک نقاشی ساده آپلود کنید و آن را به یک عکس باکیفیت تبدیل کنید.
"Turn the drawings into stunning photographs"
12. طراحی به سبک Low-Poly
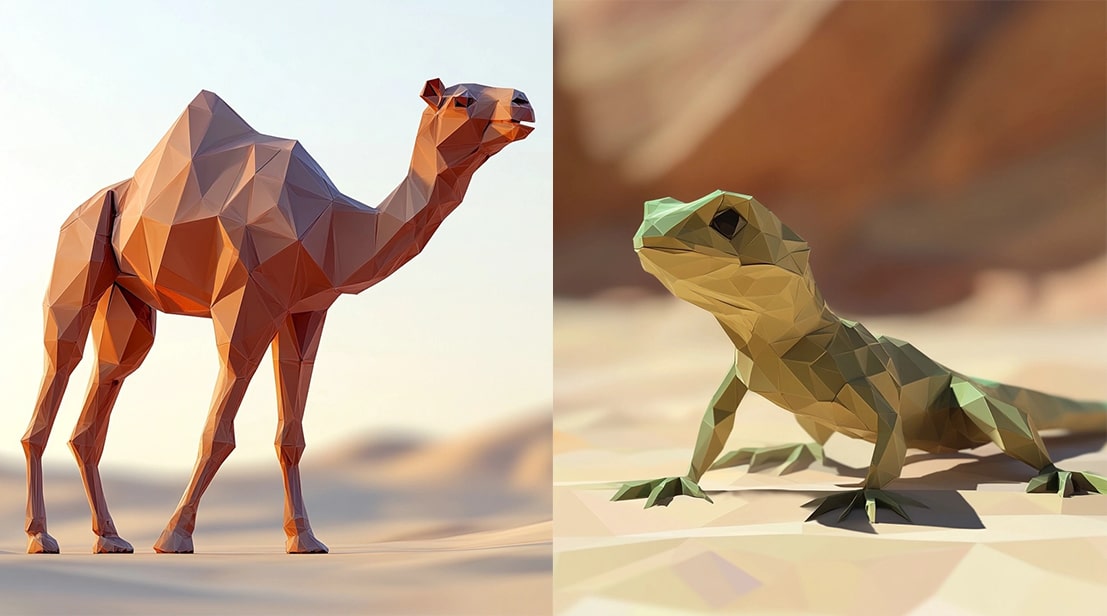
توضیح: تبدیل تصویر به رندر سهبعدی با سبک کمچندضلعی.
مثال استفاده: عکسی از یک شتر آپلود کنید و آن را به یک مدل Low-Poly در بیابان تبدیل کنید.
"A low-poly 3D render of a camel, built from clean triangular facets with flat sandy beige and burnt orange surfaces. The environment is a stylized digital desert with minimal geometry and ambient occlusion."
13. مجسمه مرمری
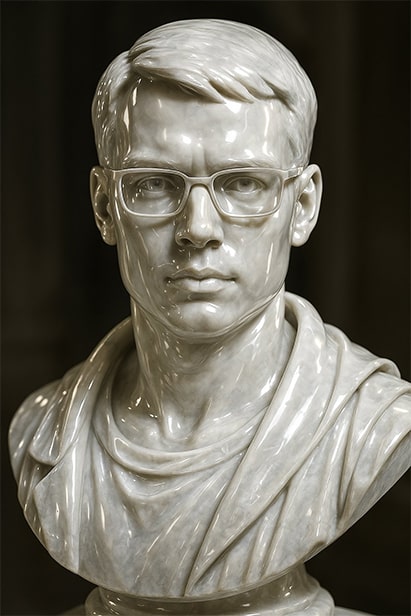
توضیح: تبدیل تصویر به مجسمهای مرمری با بافت براق.
مثال استفاده: تصویر پروفایل خود را آپلود کنید و آن را به یک مجسمه مرمری تبدیل کنید.
"A photorealistic image of an ultra-detailed sculpture of the subject in image made of shining marble. The sculpture should display smooth and reflective marble surface, emphasizing its luster and artistic craftsmanship. The design is elegant, highlighting the beauty and depth of marble. The lighting in the image should enhance the sculpture's contours and textures, creating a visually stunning and mesmerizing effect"
14. ترمیم عکسهای قدیمی
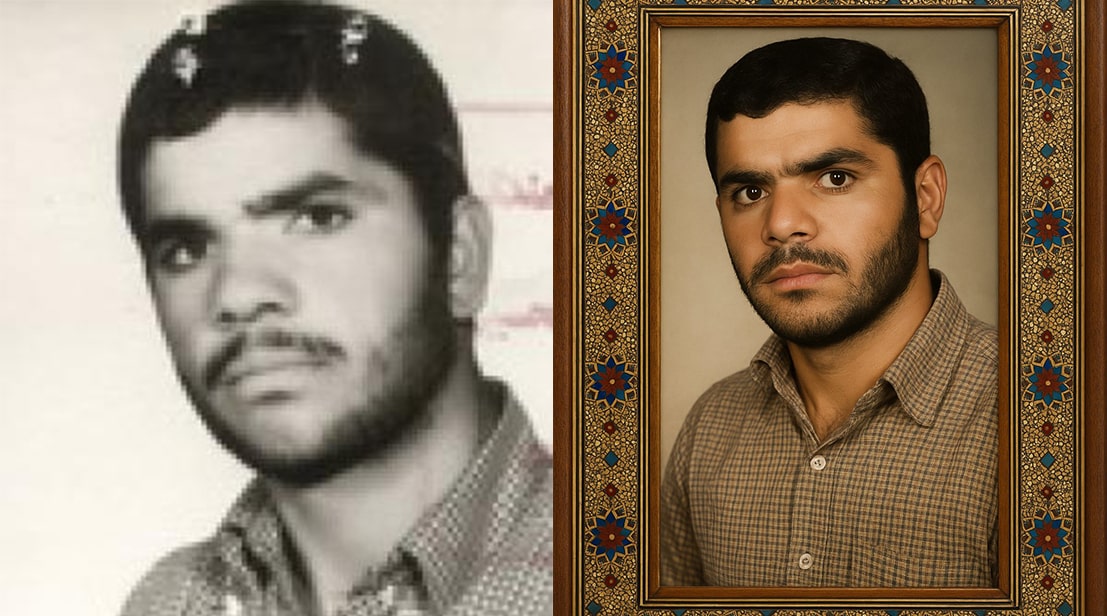
توضیح: ترمیم و رنگآمیزی عکسهای تاریخی با قاب خاتمکاری.
مثال استفاده: عکسی قدیمی آپلود کنید و آن را با قاب خاتمکاری زیبا ترمیم کنید.
{
  "prompt": "Restore and colorize this historical photograph while maintaining perfect facial similarity and original composition. Apply professional photo restoration techniques to repair damages, cracks, and fading. Use historically accurate and natural color tones for skin, clothing, and environment based on the time period. After restoration, add a hyper-realistic Persian Khatam-style decorative frame surrounding the photograph. The Khatam frame must be photographically realistic, showing actual wood, bone, and metal inlays with visible material textures, reflections on metal elements, and natural wood grain. Capture the intricate geometric mosaic patterns of authentic Khatam craftsmanship with precise detail, including the characteristic star patterns in traditional Persian designs with rich colors including turquoise, gold, deep red, and royal blue. Include subtle imperfections, light reflections, and natural shadows that would appear in a photograph of a real Khatam frame. The final image must be indistinguishable from a high-resolution photograph of a restored image in a handcrafted Khatam frame. The subject's identity, expressions, and key features must remain 100% faithful to the original photograph.",
  "negative_prompt": "Blurry, oversaturated, cartoon-like, illustrated frame, drawing-style frame, distorted faces, changed facial features, modernized appearance, inaccurate colors, simplified frame, flat-looking frame, 2D frame, stylized frame, pixelated, low resolution, watermarks, signatures, text overlays, anachronistic elements, digital artifacts, synthetic-looking skin, over-smoothed details, unrealistic lighting, altered composition, changed background, modern clothing styles, painted frame, artificial textures, lack of material detail in frame, uniform wood color, artificial patterns",
  "parameters": {
    "restoration_strength": 0.95,
    "colorization_accuracy": 0.92,
    "face_similarity_preservation": 0.98,
    "detail_enhancement": 0.85,
    "noise_reduction": 0.75,
    "frame_complexity": 0.88,
    "khatam_pattern_authenticity": 0.9,
    "historical_color_accuracy": 0.85,
    "overall_photorealism": 0.99,
    "frame_photorealism": 0.98,
    "material_texture_detail": 0.97,
    "lighting_realism": 0.96,
    "sampling_method": "DPM++ 2M Karras",
    "sampling_steps": 30,
    "cfg_scale": 7.5,
    "seed": -1,
    "width": 1024,
    "height": 1024,
    "denoise_strength": 0.75
  },
  "additional_notes": "Ensure the final image has the authentic appearance of a professionally restored vintage photograph with natural skin tones and period-appropriate colors. The Khatam frame must appear as a real photographed physical object, not an illustration or digital creation. Include photographic details like subtle depth of field effects on the frame, natural variations in lighting across different inlay materials, microscopic imperfections in the craftsmanship, and realistic surface reflections that would be captured in a high-quality photograph of a handmade Khatam frame. The wood should show authentic grain patterns, the bone inlays should have subtle translucency at edges, and metal elements should exhibit appropriate specular highlights. Photograph Ascertain-like shadows should be cast by the frame according to the lighting conditions. The transition between photo and frame should appear as in a real photograph of a professionally matted and framed vintage photo. The entire image should have photographic qualities including natural depth, subtle lens characteristics, and realistic material rendering that would be impossible to draw or illustrate."
}
15. حماسه شاهنامه
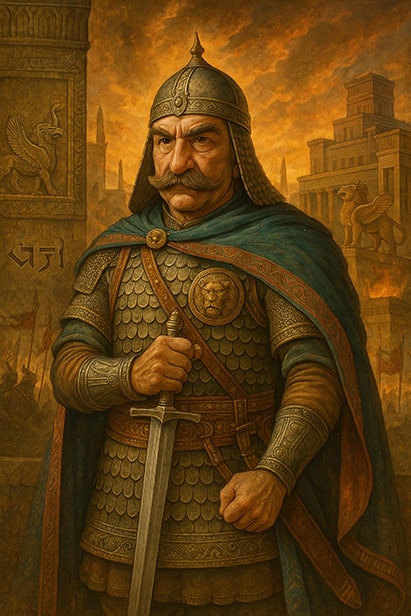
توضیح: قرار دادن سوژه در دنیای حماسی شاهنامه با لباس ساسانی.
مثال استفاده: عکسی از خودتان آپلود کنید و خود را در نقش رستم تصور کنید.
{
  "transformation": "insert_subject_into_shahnameh_world",
  "style": "realistic_persian_epic_illustration",
  "subject": {
    "preserve": ["face_structure", "expression", "gender_identity"],
    "outfit": "authentic_sassanid_warrior_attire_with_scaled_armor,_leather_straps,_metallic_belts,_and_lion_or_sun_emblems",
    "pose": "heroic_pose_holding_double-edged_sword_or_mace",
    "accessories": ["sassanid_helmet_with_flaps", "arm_guards", "boots", "decorated_cloak"]
  },
  "environment": {
    "scene": "epic_battle_or_palace_setting_from_shahnameh",
    "inspiration": [
      "rostam_vs_div",
      "zahhak's_throne",
      "palace_of_kay_khosrow",
      "plain_of_seven_labs"
    ],
    "background": "rocky_landscape,_persepolis-like_palaces,_stone_columns,_ancient_ziggurat_in_distance,_burning_sky",
    "elements": [
      "no_islamic_architecture",
      "winged_lion_griffins",
      "stone_walls_with_cuneiform_and_sassanid_motifs",
      "zoroastrian_fire_temple_glow",
      "battle_standards_and_banners"
    ],
    "color_palette": "bronze,_earthy_red,_deep_gold,_royal_blue",
    "texture": "detailed_historical_style_with_fine_brushwork_and_mythical_glow"
  },
  "text_overlay": {
    "enabled": true,
    "text": "𐎠𐎼𐎹𐎠𐎶",
    "style": "cuneiform_engraved_into_stone_background",
    "position": "lower_corner_or_ancient_wall"
  },
  "technical": {
    "resolution": "ultra_8k",
    "render": "realistic_with_epic_light,_deep_contrast,_dust_and_mystic_particles",
    "post_processing": "vintage_texture,_sun_rays_through_smoke,_slight_grain"
  },
  "mood": "ancient,_heroic,_mythical,_pre-islamic_persian_legends"
}
16. نوستالژی دهه پنجاه ایران
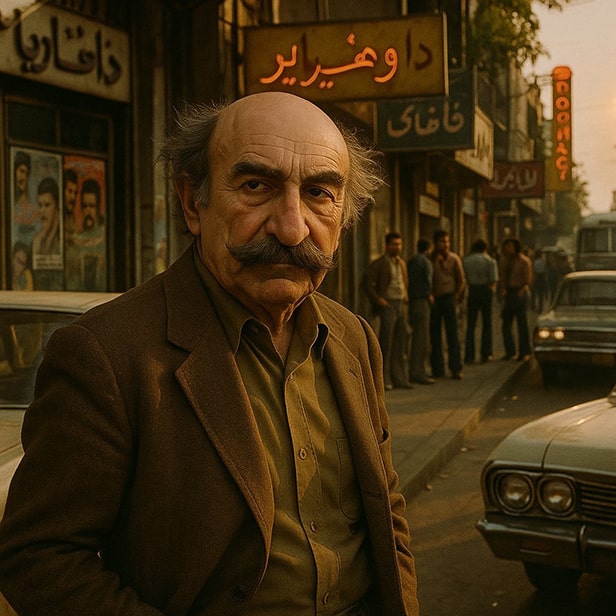
توضیح: تبدیل تصویر به صحنهای سینمایی از تهران دهه 50.
مثال استفاده: عکسی از خودتان آپلود کنید و خود را در لالهزار دهه 50 تصور کنید.
{
"transformation": "cinematic_ultrarealism_vintage",
"target_era": "iran_1970s_tehran_before_revolution",
"scene_type": "street_portrait_with_environment",
"resolution": "8k_ultra_detail_filmic_render",
"style": "vintage_iranian_new_wave_cinema_poster",
"color_mode": "rich_faded_kodachrome_with_warm_shadows",
"subject": {
"preserve": ["identity", "facial_features", "expression", "natural_skin_texture"],
"expression": "calm_powerful_gaze",
"gaze_direction": "slightly_off_camera",
"clothing": "brown_or_olive_70s_style_suit_with_open_collar_shirt",
"accessories": "vintage_rayban_sunglasses_optional",
"pose": "relaxed_hand_in_pocket_leaning_near_storefront"
},
"background": {
"location": "central_tehran_valiasr_or_lalehzar_street_1970s",
"elements": [
"classic_peykan_and_chevrolet_impala_cars",
"wall_posters_with_film_titles",
"group_of_men_in_bell_bottom_pants_and_mustaches",
"neon_signs",
"metal_signs_on_shops",
"dusty_sidewalks_with_sun_rays",
"bicycles_and_old_bus",
"dokan_and_darookhane"
],
"shop_signs": {
"language": "persian",
"font": "authentic_handwritten_iranian_1970s",
"clarity": "very_high_res_and_readable",
"random_selection": {
"count": 3,
"options": [
"سوپر نادری",
"کبابی معتمد",
"داروخانه شهریار",
"سینما هما",
"کافه لالهزار",
"لباس مردانه تهران",
"عطر فروشی شرق",
"نانوایی یزدی",
"خیاطی امیر"
]
}
}
},
"lighting": {
"type": "natural_golden_hour_with_cinematic_fill",
"effects": [
"lens_flare_on_lens_edge",
"soft_light_on_face_with_warm_shadow_under_chin",
"sun_glare_on_car_chrome",
"ambient_glow_in_neon_signs"
],
"shadow_style": "long_dramatic_shadows_on_ground"
},
"technical_details": {
"lens_type": "35mm_prime_analog_with_deep_bokeh",
"film_texture": "authentic_kodak_gold_filmgrain",
"focus": "sharp_on_eyes_soft_fade_to_background",
"post_processing": "vintage_film_overlay_with_edge_burn",
"print_finish": "archival_quality_paper_glossy_effect"
},
"mood": "deeply_nostalgic_dramatic_and_cinematic",
"vibe": "iranian_james_dean_meets_old_tehran_vibes",
"purpose": "create_unique_timeline_profile_that_blends_identity_with_lost_era_aesthetics"
}
17. عروسکهای فوتورئالیستی
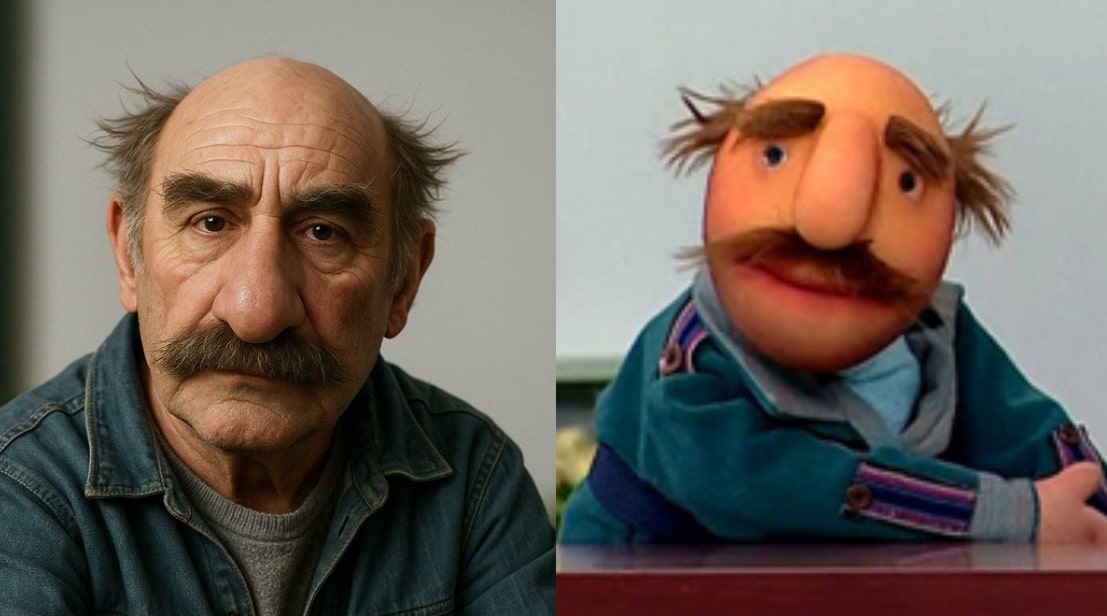
توضیح: تبدیل طراحی عروسک به عکسی واقعی.
مثال استفاده: طرح یک عروسک آپلود کنید و آن را به عکسی واقعی تبدیل کنید.
{
  "prompt": "Transform a puppet drawing into a photorealistic image with the following specifications:",
  "parameters": {
    "composition": {
      "preserve": ["original layout", "proportions", "framing", "subject placement"],
      "enhance": ["depth of field", "dimensional perspective"]
    },
    "visual_elements": {
      "maintain": ["character pose", "facial expression", "distinctive features", "clothing/costume details"],
      "translate": "all stylized elements into realistic equivalents"
    },
    "technical_aspects": {
      "lighting": ["soft natural lighting", "subtle highlights", "realistic shadows", "proper rim lighting"],
      "textures": ["detailed skin/surface textures", "fabric weave patterns", "material-appropriate reflections"],
      "colors": ["natural color palette", "subtle color grading", "proper skin tones", "realistic color variation"]
    },
    "photography_simulation": {
      "camera": ["high-resolution DSLR quality", "shallow depth of field where appropriate"],
      "lens": ["85mm portrait lens simulation", "slight lens compression"],
      "post-processing": ["natural contrast", "balanced highlights and shadows", "subtle film grain"]
    },
    "constraints": {
      "fidelity": "maintain recognizable connection to original artwork",
      "realism": "should appear as if professionally photographed in real world",
      "avoid": ["uncanny valley effects", "obvious digital artifacts", "overprocessed appearance"]
    }
  },
  "style_reference": "professional portrait photography",
  "quality_level": "ultra-detailed",
  "format": "high resolution"
}
18. لباس عروس
توضیح: تبدیل تصویر به پرتره عروس با لباس طراحیشده توسط طراحان مطرح.
مثال استفاده: عکسی از خودتان آپلود کنید و خود را در لباس عروس ورا وانگ تصور کنید.
{
  "prompt": "Create a hyper-realistic wedding portrait of the woman from the provided photo, transformed as a bride wearing a [USER_SELECTED_DESIGNER] style wedding dress. Maintain exact facial features, age, and ethnicity, but remove any head covering or hijab. Capture with beautiful [LIGHTING_STYLE] and professional depth of field that softly blurs the background while keeping the face in sharp focus. Frame the portrait in an elegant [FRAME_STYLE] composition.",

  "user_selections": {
    "designer": "[USER SELECTS ONE OPTION]",
    "lighting": "[USER SELECTS ONE OPTION]",
    "frame": "[USER SELECTS ONE OPTION]"
  },

  "designer_options": [
    "Vera Wang (modern, architectural lines, sculptural)",
    "Oscar de la Renta (classic elegance with intricate details)",
    "Carolina Herrera (sophisticated minimalism)",
    "Marchesa (romantic, ethereal with floral appliqués)",
    "Monique Lhuillier (feminine with delicate lace)",
    "Pronovias (contemporary, clean lines)",
    "Elie Saab (dramatic with elaborate beadwork)",
    "Reem Acra (luxurious embellishments)"
  ],

  "lighting_options": [
    "soft natural light streaming through windows",
    "golden hour sunlight creating a warm glow",
    "professional studio lighting with subtle highlights",
    "dramatic side lighting creating elegant shadows"
  ],

  "frame_options": [
    "intimate close-up portrait focusing on face and upper body",
    "three-quarter length portrait showing dress details",
    "full-length elegant pose highlighting the complete silhouette",
    "cinematic wide frame in an ornate wedding venue setting"
  ],

  "technical_requirements": {
    "style": "hyper-realistic professional photography",
    "quality": "ultra high-definition",
    "focus": "sharp focus on face with pleasing bokeh background",
    "preservation": "maintain exact facial identity, age, and ethnicity"
  },

  "special_notes": "Remove any head covering/hijab from the reference photo while maintaining cultural sensitivity and natural hair appearance. Ensure the final image has the exact same facial features as the provided photo."
}
19. جلوه پشمالوی لوگو
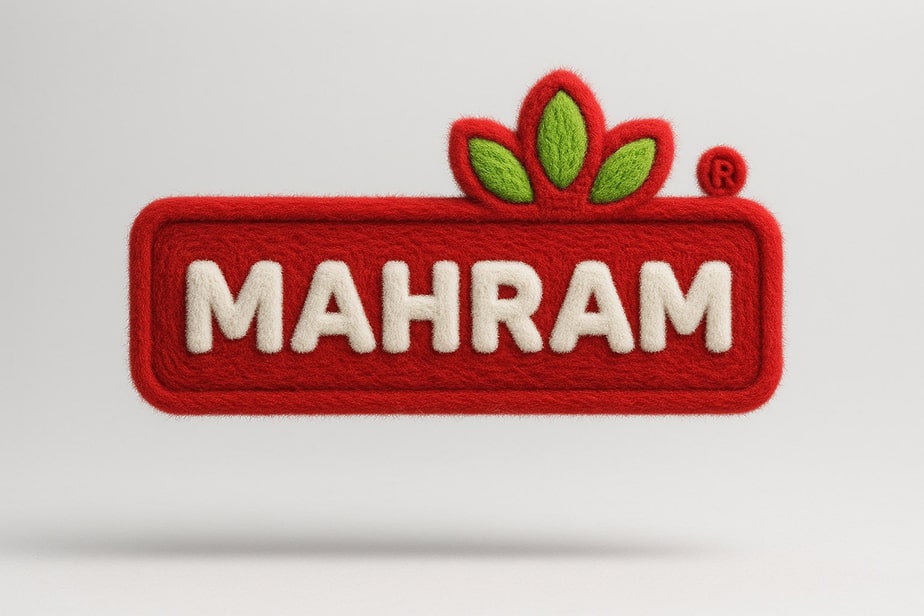
توضیح: تبدیل تصویر به شیء سهبعدی با پوشش کرکی.
مثال استفاده: عکسی از یک شیء آپلود کنید و آن را به یک اثر پشمالوی سورئال تبدیل کنید.
{
  "prompt": {
    "subject": {
      "type": "3D fluffy object",
      "source": "reference_image",
      "transformation": "complete fur coverage",
      "color_treatment": "exact match to reference",
      "material_properties": {
        "texture": "hyperrealistic fur",
        "detail_level": "individual hair strands",
        "variations": {
          "length": "subtle natural variation",
          "thickness": "varied for realism",
          "clumping": "natural fur patterns"
        },
        "physics": "soft, yielding surface"
      }
    },
    "composition": {
      "position": "centered",
      "pose": "floating gently",
      "perspective": "straight-on with slight elevation"
    },
    "background": {
      "type": "clean light gray",
      "color": {
        "rgb": [230, 230, 230],
        "gradient": "subtle radial fade to edges"
      },
      "depth": "infinite studio backdrop"
    },
    "lighting": {
      "setup": "professional studio",
      "key_light": {
        "position": "upper right",
        "quality": "soft diffused",
        "intensity": 0.8,
        "color_temperature": "5500K"
      },
      "fill_light": {
        "position": "left side",
        "quality": "very soft",
        "intensity": 0.4,
        "color_temperature": "6000K"
      },
      "rim_light": {
        "position": "behind subject",
        "quality": "focused",
        "intensity": 0.3,
        "color_temperature": "5000K"
      },
      "shadows": {
        "softness": "high",
        "opacity": 0.4,
        "color": "slightly cooler than background"
      }
    },
    "render_settings": {
      "resolution": "8K (7680x4320)",
      "quality": "photorealistic",
      "depth_of_field": {
        "enabled": true,
        "focus": "subject",
        "aperture": "f/4.0",
        "bokeh": "subtle circular"
      },
      "shader": "physically based rendering",
      "hair_simulation": "advanced physics-based"
    },
    "style": {
      "aesthetic": ["surreal", "tactile", "modern", "hyperrealistic"],
      "mood": ["comforting", "playful", "curious", "serene"],
      "references": ["luxury product photography", "contemporary art", "tactile sculptures"]
    },
    "negative_prompt": [
      "hard edges",
      "cartoon style",
      "low resolution",
      "flat lighting",
      "busy background",
      "distorted proportions",
      "unrealistic fur",
      "harsh shadows"
    ]
  }
}
20. پرترههای تایپوگرافیک
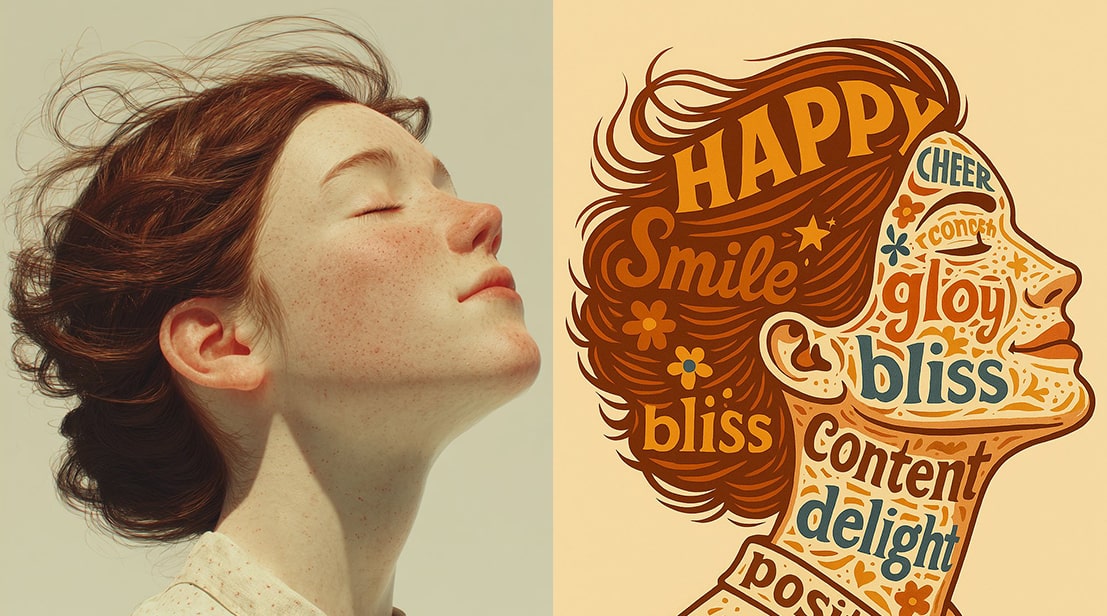
توضیح: بازسازی تصویر بهعنوان پرترهای تایپوگرافیک با موضوع شادی.
مثال استفاده: عکسی آپلود کنید و آن را به پرترهای تایپوگرافیک تبدیل کنید.
"Recreate the attached image as Typography Portrait. Subject is happiness."
21. مداد رنگی روی کاغذ
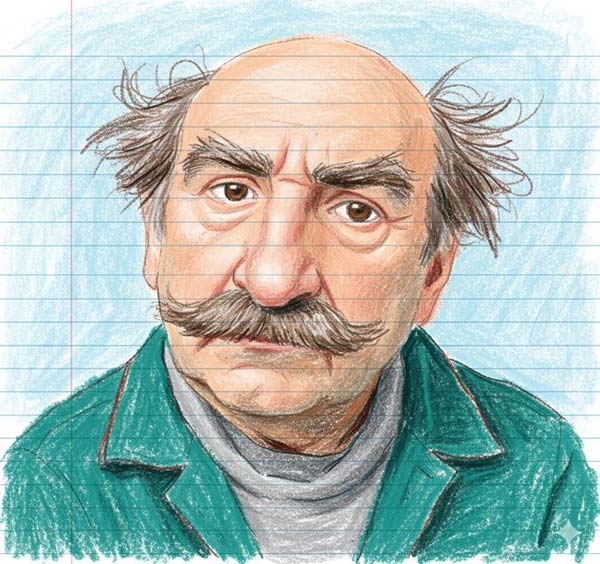
توضیح: تا حالا شده بخواین تصویر خودتون به صورت یک نقاشی ببینید با این پرامپت میتونید تصویر خودتون رو به یک نقاشی که با مداد رنگی روی کاغذ خط دار کشیده شده تبدیل کنید.
مثال استفاده: هر عکسی که دوست دارید رو به همراه پرامپت زیر به هوش مصنوعی بدید و تصویرتون رو تبدیل به یک نقاشی کنید.
"**Transform this reference image into a childlike crayon drawing on lined paper:** **Preserve from the original:** - Face shape and proportions - Skin tone - Hairstyle (style and color) - Facial expression - Outfit (clothing items and colors) **Style requirements:** - Medium: Crayon drawing with vibrant, saturated colors - Texture: Messy, uneven strokes with visible crayon marks and wax-like quality - Artistic level: Childlike interpretation with simplified details and slight caricature elements - Paper: Blue horizontal lined notebook paper, with lines visible **Simplification guidelines:** - Keep overall body proportions recognizable but slightly exaggerated - Simplify facial features while maintaining the essential expression - Reduce fine details to basic shapes and bold outlines - Background should be simplified and loosely sketched—recognizable but minimal, using the same general color palette as the original **Overall effect:** The drawing should look authentic, as if created by a child aged 6-10 using crayons on school notebook paper."
22. قلم زنی و آبرنگ
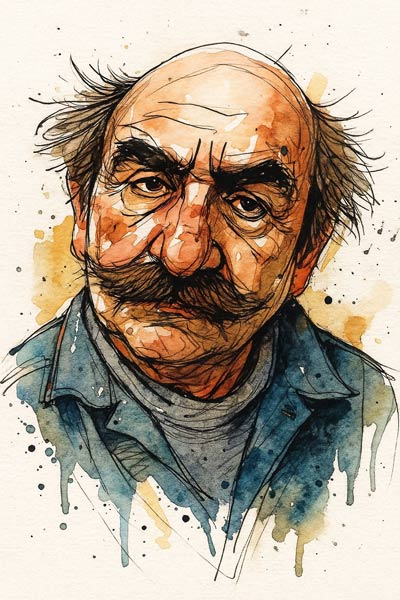
توضیح: این پرامپت واسه تکنیک قلم فلزی و آبرنگ در تصویرسازی کتاب داستان یا گزارش هنری میتونه کمکتون کنه.
مثال استفاده: مثلا میتونین محتوا رو بصورت سکانس عکاسی کنید و با این پرامپت به اونا استایل واحد بدید.
Create an expressive ink and watercolor illustration with the following artistic approach: Ink Technique: •Use bold, confident ink lines with visible brush strokes and natural imperfections •Employ varied line weights - thick for emphasis, thin for delicate details •Let lines be spontaneous and gestural, capturing movement and energy •Include intentional “mistakes” like ink blots, line breaks, and rough edges that add character Watercolor Application: •Apply translucent washes that bleed and flow naturally beyond ink boundaries •Use wet-on-wet techniques for soft, organic color transitions •Layer colors to create depth while maintaining transparency •Allow controlled accidents - color bleeds, unexpected mixing, and uneven saturation Character and Form: •Stylize subjects with exaggerated proportions and dynamic poses •Emphasize emotional expression through bold facial features and body language •Simplify complex details while amplifying key characteristics •Balance realistic elements with artistic interpretation Composition and Finish: •Leave strategic white space for visual breathing room •Vary completion levels - some areas fully rendered, others merely suggested •Create texture that mimics handmade paper with subtle grain •Maintain an authentic, studio-created feel with visible artistic process Overall Mood: Capture the spontaneous energy of a live sketch session with the refined beauty of watercolor painting.
23. تبدیل عکس به فرمت کتاب های رنگ آمیزی
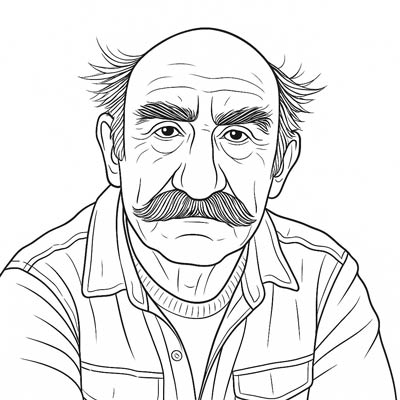
توضیح: با این پرامپت میتونین عکسهای خانوادگی خودتون را به فرمت کتابهای رنگ آمیزی پرینت کنید و با یک جعبه مداد رنگی در اختیار فرزندانتون بذارید. کافیه عکس را به همراه پرامپت در ChatGPT وارد کنید. رنگ آمیزی سرگرمی سالم و بانشاطی برای کودکان است.
مثال استفاده: میتوانید عکس های شخصی و یا حتی عکس هایی از حیوانات و طبیعت را آپلود کنید و آن ها تبدیل به یک کتاب رنگ آمیزی کنید.
{ "service": "Professional Coloring Book Conversion", "description": "Convert a photograph into a high-quality coloring book illustration", "conversionRequirements": [ "Create clean, well-defined black outlines of all significant elements in the image", "Simplify complex textures while maintaining recognizable shapes", "Remove background noise and unnecessary details", "Ensure outlines are continuous with no broken lines", "Optimize line thickness for coloring (neither too thin nor too thick)" ], "importantConsiderations": [ "Preserve the character and essential details of the main subjects", "Create distinct coloring sections that are appropriate for various skill levels", "Maintain proper proportions and spatial relationships between elements", "Avoid creating areas that are too small or intricate to color comfortably", "Ensure the final image has sufficient white space for coloring" ], "outputFormat": { "resolution": "High-resolution (minimum 300 DPI)", "colorScheme": "Black and white image", "background": "Clean white background with black lines only", "shading": "No grayscale or shading elements", "printReady": "Suitable for standard coloring books" }, "goal": "A professional-quality coloring page that captures the essence of the original photograph while providing an enjoyable coloring experience for the intended audience" }24. حکاکی روی چوب
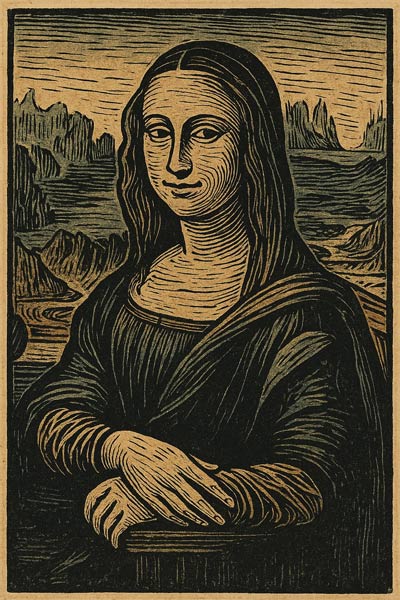
توضیح: حکاکی روی چوب ازجمله هنرهای ژاپن، از تکنیک های گرافیکی مورد پسند دههی پنجاه شاهنشاهی بود. حالا بدون مغار و چوب همان استایل با قابلیت تنظیم متغیرها در چتجیپیتی و سرویس های مشابه در دستان شماست.
[{ "prompt": "Transform the uploaded photo into a traditional woodcut/block print style. Apply strong carved line work, bold contrasts between light and dark areas, and visible wood grain textures. Create the appearance of hand-carved relief printing with slight imperfections in ink application. Style should evoke traditional Japanese ukiyo-e prints with simplified forms, limited color palette, and distinctive line work that shows the carving process. Maintain the composition of the original image while transforming it into this artistic printmaking aesthetic.", "negative_prompt": "photorealistic details, smooth gradients, digital appearance, camera artifacts, modern printing techniques, excessive detail, photographic shading, 3D rendering", "parameters": { "style_preset": "woodcut_print", "line_weight": 0.8, "line_definition": 0.85, "contrast_enhancement": 0.75, "detail_simplification": 0.7, "texture_strength": { "wood_grain": 0.65, "paper_texture": 0.4, "ink_distribution": 0.55 }, "color_parameters": { "palette_restriction": true, "max_colors": 6, "color_separation": 0.8, "color_flatness": 0.9, "color_vibrancy": 0.7 }, "print_artifacts": { "registration_misalignment": 0.2, "ink_density_variation": 0.3, "edge_roughness": 0.45, "plate_impression_depth": 0.5 }, "japanese_print_elements": { "bokashi_gradient": 0.4, "key_line_emphasis": 0.8, "compositional_flattening": 0.75, "negative_space_emphasis": 0.6 }, "source_influence": 0.4, "artistic_interpretation": 0.7 }, "reference_artists": ["Katsushika Hokusai", "Utagawa Hiroshige", "Albrecht Dürer", "Kitagawa Utamaro"], "reference_image": "user_uploaded_photo", "output_format": "png", "resolution": "high" }25. نوشتن اسم با خط هیروگلیف
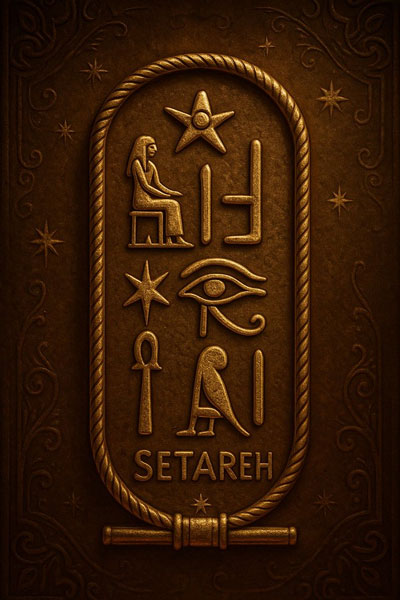
توضیح: اگه یه روز کنجکاو بودین که اسمتون به هیروگلیف چطوری نوشته میشه این پرامپت ابزار مناسب واسه پاسخ است.
مثال استفاده: میتونید اسم خودتون و یا اطرافیانتون رو به صورت هیروگلیف بنویسید. برای طراحی لوگوی شخصی هم بسیار مناسبه.
"Ancient Egyptian cartouche containing the name [NAME] written in authentic hieroglyphic script, golden oval-shaped cartouche with ornate rope borders, detailed Egyptian hieroglyphs arranged vertically, glowing golden papyrus background, mystical ancient temple lighting, ornate decorative elements, star symbols integrated throughout, warm golden and bronze color palette, cinematic lighting with dramatic shadows, high detail, photorealistic rendering, ancient Egyptian art style, museum quality, 8K resolution"
نکات کلیدی برای استفاده از پرامپتها
1. دقت در جزئیات: پرامپتها را دقیقاً همانطور که ارائه شدهاند وارد کنید و در صورت نیاز، بخشهای متغیر (مثل نام طراح یا شعار) را جایگزین کنید.
2. انتخاب تصویر مناسب: تصاویری با کیفیت بالا و نورپردازی خوب نتایج بهتری تولید میکنند.
3. آزمایش و خطا: گاهی اوقات نیاز است پرامپت را کمی تغییر دهید تا به نتیجه دلخواه برسید.
4. حفظ هویت: در پرامپتهایی که چهره انسان را تغییر میدهند، مطمئن شوید گزینههای حفظ شباهت فعال هستند.
5. استفاده از DeepSearch (در صورت نیاز): اگر به اطلاعات بیشتری درباره سبک یا دوره خاصی نیاز دارید، از حالت DeepSearch در ChatGPT استفاده کنید.
نتیجهگیری
پرامپتهای ChatGPT دریچهای به دنیای بیانتهای خلاقیت هستند. با این ابزار، میتوانید تصاویر خود را به آثار هنری، اسباببازیهای بامزه، یا پرترههای تاریخی تبدیل کنید. چه بخواهید یک عروسک بافتنی برای فرزندتان بسازید، چه پرترهای حماسی در دنیای شاهنامه خلق کنید، این پرامپتها شما را به مقصد میرسانند. پس دست به کار شوید، تصاویر خود را آپلود کنید و با ChatGPT، خلاقیت خود را آزاد کنید!
پرامپت مورد علاقه شما کدام است؟ تجربه خود را با ما در میان بگذارید و اگر پرامپت خلاقانه دیگری طراحی کردهاید، آن را به اشتراک بگذارید تا دیگران نیز از آن بهرهمند شوند!
برای ثبت دیدگاه وارد حساب کاربری خود شوید.